Metal roofing has become one of the most popular roofing options due to its durability, energy efficiency, and long lifespan. Learning how to install metal roofing correctly can save money and ensure long-term protection for your home or building. This guide covers everything you need to know, from preparation and tools to installation steps, safety tips, and maintenance. If done properly, metal roofing can last 40–70 years with minimal upkeep.
Understanding Metal Roofing
Metal roofing is made from materials like steel, aluminum, zinc, or copper and is available in panels or shingles. It is designed to resist extreme weather, fire, and corrosion, making it ideal for residential and commercial buildings. Before learning how to install metal roofing, it is important to understand the type of metal and profile best suited for your climate. Choosing the right material ensures better performance and reduces future repair costs.
Metal roofing panels are lightweight compared to traditional shingles, which reduces stress on the structure. They also reflect sunlight, helping lower energy bills in hot climates. When properly installed, metal roofs provide excellent water shedding and wind resistance. This makes them a reliable long-term investment.
Tools and Materials Required
Before starting how to install metal roofing, gather all necessary tools and materials to avoid delays. Common tools include a drill, metal snips, tape measure, chalk line, safety gloves, and a ladder. You will also need screws with neoprene washers, underlayment, flashing, ridge caps, and closure strips.
Having the correct materials ensures proper sealing and alignment of panels. Using manufacturer-recommended fasteners is crucial to prevent leaks and panel movement. Quality tools also help achieve precise cuts and secure fastening. Preparation at this stage directly affects the final result.
Safety Precautions Before Installation
Safety is critical when learning how to install metal roofing, as roofing work involves heights and sharp materials. Always wear gloves to protect against sharp metal edges and use non-slip footwear. A safety harness is strongly recommended when working on steep or high roofs.
Avoid installing metal roofing in wet or windy conditions, as metal surfaces can become slippery. Ensure ladders are stable and placed on solid ground. Taking proper safety measures reduces the risk of accidents and ensures a smooth installation process.
Preparing the Roof Surface
Proper roof preparation is a key step in how to install metal roofing successfully. Start by inspecting the existing roof for damage, rot, or uneven surfaces. Any damaged decking should be repaired or replaced before installation begins.
Next, install a roofing underlayment to provide an additional moisture barrier. This layer helps protect against leaks caused by condensation or wind-driven rain. A smooth and clean surface ensures that metal panels sit correctly and last longer.
Measuring and Planning Panel Layout
Accurate measurements are essential when learning how to install metal roofing. Measure the roof length, width, and slope to calculate the number of panels required. Use a chalk line to mark straight reference lines for panel alignment.
Proper planning minimizes material waste and ensures a uniform appearance. Panels should be arranged to allow proper overlap for water runoff. Careful layout planning also helps avoid mistakes that could lead to leaks or uneven installation.
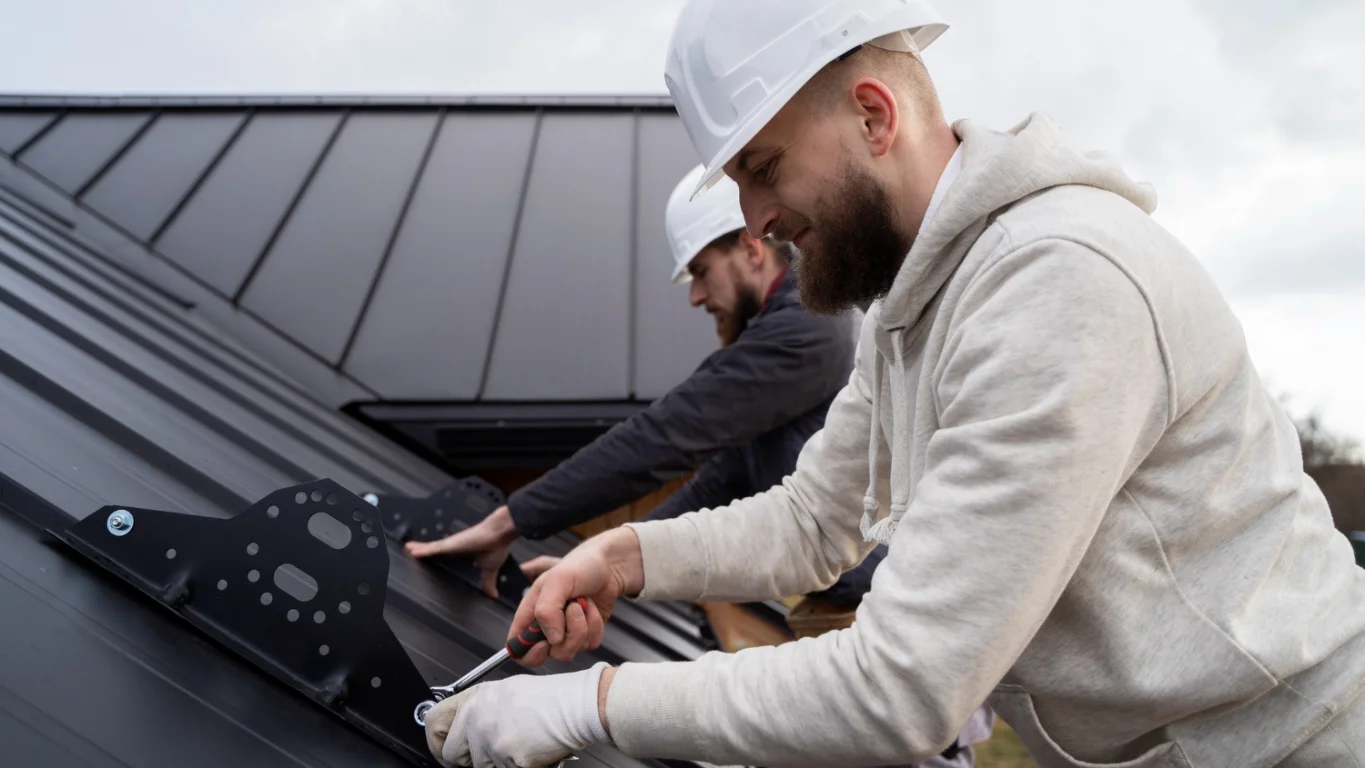
Installing the Metal Panels
The core step in how to install metal roofing is panel installation. Begin at the roof edge, usually at the eave, and work upward toward the ridge. Align the first panel carefully, as it determines the alignment of the remaining panels.
Secure panels using screws placed in the recommended locations, usually along the flat sections or ridges depending on the panel type. Do not overtighten screws, as this can damage the washer and cause leaks. Consistent fastening ensures stability and weather resistance.
Installing Flashing and Trim
Flashing and trim are critical components in how to install metal roofing correctly. Flashing is installed around chimneys, vents, skylights, and roof edges to prevent water infiltration. These areas are common sources of leaks if not sealed properly.
Trim pieces such as gable trim and eave trim provide a finished look and additional protection. Properly installed flashing directs water away from vulnerable areas. This step significantly improves the roof’s durability and performance.
Installing Ridge Cap and Closure Strips
The ridge cap is the final major step in how to install metal roofing. Closure strips are placed beneath the ridge cap to seal gaps between panels and prevent pests or debris from entering. These strips also help reduce wind-driven rain intrusion.
Secure the ridge cap using recommended fasteners, ensuring proper overlap between sections. A well-installed ridge cap allows proper ventilation while keeping the roof watertight. This step completes the structural integrity of the roof system.
Common Mistakes to Avoid
When learning how to install metal roofing, avoiding common mistakes is crucial for long-term success. One common error is improper screw placement, which can lead to leaks or loose panels. Another mistake is skipping underlayment, which reduces moisture protection.
Incorrect panel alignment can affect both appearance and performance. Using incompatible materials or low-quality fasteners may shorten the roof’s lifespan. Careful attention to detail helps avoid costly repairs later.
Maintenance Tips After Installation
After completing how to install metal roofing, regular maintenance ensures longevity. Inspect the roof annually for loose screws, damaged panels, or worn sealant. Cleaning debris from valleys and gutters helps prevent water buildup.
Minor issues should be addressed promptly to avoid larger problems. Metal roofing generally requires less maintenance than other roofing types. With proper care, it will continue to perform efficiently for decades.
Conclusion
Learning how to install metal roofing properly ensures a durable, weather-resistant, and energy-efficient roof. From preparation and safety to panel installation and finishing details, each step plays a vital role in overall performance. Metal roofing is a long-term investment that rewards careful planning and correct installation. By following best practices, you can achieve professional-quality results and long-lasting protection.
FAQs
How long does it take to install metal roofing?
The time required depends on roof size, complexity, and experience level. On average, a standard residential roof can take 2–4 days. Proper preparation can significantly reduce installation time.
Can metal roofing be installed over existing shingles?
Yes, in many cases metal roofing can be installed over existing shingles if local codes allow it. However, the roof structure must be inspected for damage first. Installing a proper underlayment is still essential.
Is metal roofing noisy during rain?
Modern metal roofing installed with underlayment and insulation is not significantly noisier than other roofing materials. Proper installation reduces sound transmission. Noise issues are usually due to poor installation.
What is the lifespan of metal roofing?
Metal roofing typically lasts between 40 and 70 years depending on material and maintenance. It outperforms many traditional roofing options. Regular inspections help maximize its lifespan.
Do I need professional help to install metal roofing?
While DIY installation is possible, professional installation ensures accuracy and warranty protection. Complex roofs may require experienced installers. Assess your skills before deciding to install it yourself.